urce source source source source source source source source source source |
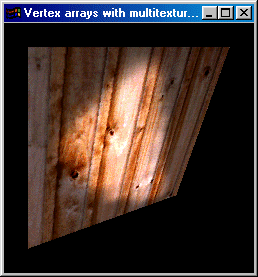
[program ten] I'm fairly new to hardware multi-texturing. My old 3d card didn't support it so I never had the chance to play with it. This page takes you through setting up the extensions, vertex arrays and the texture units to render our light mapped wooded quad from [program 7] in one multi-textured pass.
Note that this program requires your card to have the GL_ARB_multitexture extension, otherwise it won't work.

We define macros to name our
textures as per usual.
#define MAX_TEXTURES
#define WOOD_IMAGE 0
#define LIGHTMAP 1
Function pointer variables are declared for the
the multi-texture extension functions we are going to be
using. If you look in program10.h, there are many more functions that we
don't need. These are for sending texture coordinates to the texture units
one at a time (or in display lists). We're not doing that, so we don't
need them.
Line 3 is a global variable so we know whether compiled vertex arrays are
supported or not.
In fact, these lines aren't really needed, you should download a file called 'glext.h' from your video card vendor's website (Nvidia and ATI both have these on their developer websites). Doing this ensures you'll always have an up to date set of headers for extensions that YOUR video card supports.
[1] PFNGLCLIENTACTIVETEXTUREARBPROC glClientActiveTextureARB = NULL;
[2] PFNGLACTIVETEXTUREARBPROC
glActiveTextureARB = NULL;
We declare our vertex, texture coordinate and index arrays as before. Both
texture units will be using the same coordinates. Remember that there are 4 texture coordinates, one for each
vertex of the quad. For an explanation of texture mapping you can go to
...
[1] GLfloat tex_coords[] = { 0.0, 1.0,
1.0, 1.0,
1.0, 0.0,
0.0, 0.0 };
...
There isn't any lighting again in our initialisation function. Lines 3 calls a function to grab the extensions, if they are supported - it also prints out some driver statistics. Lines 8 through 12 load our textures and bind them to the texture names we've generated in line 6.
[1] void
init ( void )
[2] {
[3] get_extensions ( );
[4]
[5]
glPixelStorei ( GL_UNPACK_ALIGNMENT, 1 );
[6] glGenTextures ( 2, tex_id );
[7]
[8] glBindTexture ( GL_TEXTURE_2D, tex_id[WOOD_IMAGE] );
[9] tgaLoadImage ( "board.tga", &temp, TGA_FREE );
[10]
[11] glBindTexture ( GL_TEXTURE_2D, tex_id[LIGHTMAP] );
[12] tgaLoadImage ( "lightmap.tga", &temp, TGA_FREE | TGA_LUMINANCE );
Line 13 enables the depth testing, 14 enables vertex arrays on the client side. Line 16 is an extension function that switches OpenGL client state to effect the first texture unit - GL_TEXTURE0_ARB. Line 17 enables the texture coordinate arrays on this texturing unit. Lines 19 and 20 do the same for the second texture unit.
[13]
glEnable ( GL_DEPTH_TEST );
[14] glEnableClientState ( GL_VERTEX_ARRAY );
[15]
[16] glClientActiveTextureARB ( GL_TEXTURE0_ARB );
[17] glEnableClientState ( GL_TEXTURE_COORD_ARRAY );
[18]
[19] glClientActiveTextureARB ( GL_TEXTURE1_ARB );
[20] glEnableClientState ( GL_TEXTURE_COORD_ARRAY );
Line 22 selects the first texture unit and 23 enables texturing on this unit. Again, lines 25 and 26 do the same on the second texture unit. Currently most hardware has only two units. The PowerVR3 chipset (when it ever gets released) will support 8-level multi-texturing - that'll be nice.
[22]
glActiveTextureARB ( GL_TEXTURE0_ARB ); The function to set the object is quite similar to the one
in program7. Line 3 passes OpenGL the address of our [1] void
set_and_draw ( void ) Line 11 selects the first texture unit and 12
binds our wood texture. Line 13 sets the texture environment to Multi-texturing hardware
is usually capable of many different blending operations. Lines 11 - 17 could
be replaced by something much more complex. GL_ARB_texture_env_combine
supplies a new texture environment mode. This has many more
blending operations and is not within the scope of this simple program (plus
I've only had a few weeks to play with it). I'll post a program that uses
the texture combiners at a later date.
[11] glActiveTextureARB ( GL_TEXTURE0_ARB ); The final line renders the quad.
[18] glDrawElements ( GL_QUADS, 4, GL_UNSIGNED_INT, &indices ); The display function is fairly unremarkable. Notice
how much simpler it is when compared with program7? We don't have to
enable and disable blending and depth testing. We just set OpenGL client
state to the arrays we want to render. Then specify the texture
environments, draw the index elements and bingo!
[23] glEnable ( GL_TEXTURE_2D );
[24]
[25] glActiveTextureARB ( GL_TEXTURE1_ARB );
[26] glEnable ( GL_TEXTURE_2D );
[27] }
Line 5 is that extension function again. As before it switches OpenGL client state to effect the
first texture unit - GL_TEXTURE0_ARB.
Line 6 passes the address of the text coordinates we are going to be
using. Lines 8 and 9 do the same for the second texture unit.
[2] {
[3] glVertexPointer ( 3, GL_FLOAT, 0, &vertices );
[4]
[5] glClientActiveTextureARB ( GL_TEXTURE0_ARB );
[6] glTexCoordPointer ( 2,
GL_FLOAT, 0, &tex_coords );
[7]
[8] glClientActiveTextureARB ( GL_TEXTURE1_ARB );
[9] glTexCoordPointer ( 2,
GL_FLOAT, 0, &tex_coords );
[12] glBindTexture
( GL_TEXTURE_2D, tex_id[ WOOD_IMAGE ] );
[13] glTexEnvi
( GL_TEXTURE_ENV, GL_TEXTURE_ENV_MODE, GL_DECAL );
[14]
[15] glActiveTextureARB ( GL_TEXTURE1_ARB );
[16] glBindTexture
( GL_TEXTURE_2D, tex_id[ LIGHTMAP ] );
[17] glTexEnvi
( GL_TEXTURE_ENV, GL_TEXTURE_ENV_MODE, GL_MODULATE );
[19] }
[1] void display (
void )
[2] {
[3] glClear ( GL_COLOR_BUFFER_BIT | GL_DEPTH_BUFFER_BIT );
[4]
[5] glLoadIdentity ( );
[6] glTranslatef ( 0.0, 0.0, -3.0 );
[7] glRotatef
( angle, 1.0, 1.0, 0.0 );
[8]
[9] set_and_draw ( );
[10]
[11] glutSwapBuffers ( );
[12] }
Website and content, Paul Groves